Html Element Properties Assistant
Html Element Properties Assistant
See also: Working with Web Resources, Rich Client Features
Description
The Html Element Properties Assistant provides support for the creation of rich client applications. It lets you configure the connection between a user action (e.g. clicking a button or moving the mouse over a text) and a snippet of JavaScript code which is to be executed by the end user’s browser. The power and flexibility of JavaScript can be used, perhaps in conjunction with helper libraries like JQuery (see http://www.jquery.com), to build enhanced user interfaces – this is what is meant by the term rich client.
Browsers respond to user actions by generating events on the appropriate html element(s) involved with the interaction. For example, a browser generates an onclick event on the button element when it is clicked by the user. Scripts, usually written in JavaScript, can then be associated with these events. For example, we might want to perform a calculation when a button is clicked and show the user the result; this is done by associating the piece of JavaScript code which performs the calculation with the button element’s onclick event.
The Html Element Properties assistant is where this association between browser events and scripting code is configured.
Html Element Properties Assistant
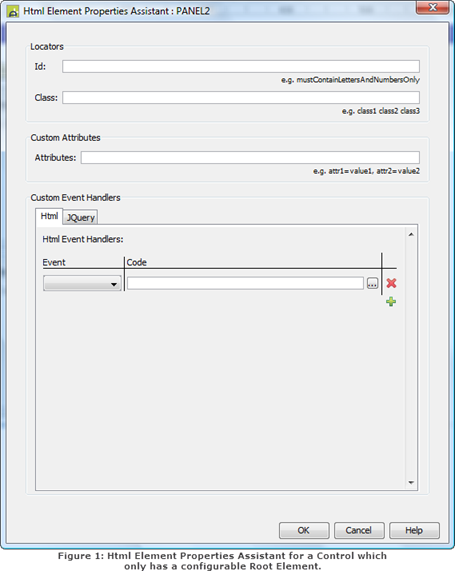
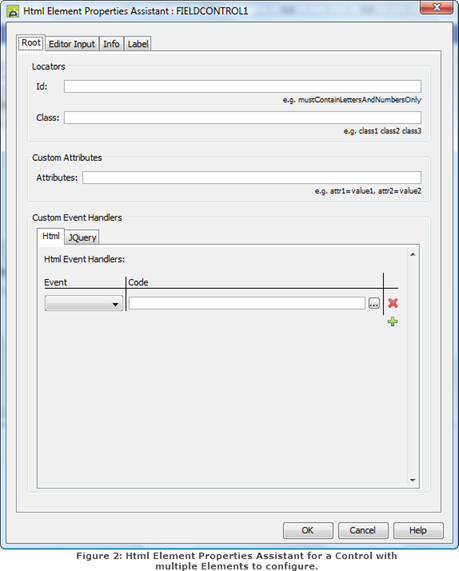
Most Controls have an Html Element Properties Assistant, which is accessible by right-clicking on the Control in the Outline or the WYSIWYG view of the Designer or from the Control’s Properties view (see Working with Forms). Each assistant allows the configuration of at least one html element within that Control.
The first html element of a Control is considered to be its Root. Some Controls, e.g. the Panel Control, can only have their Root element properties configured (see Figure 1 above); others support the configuration of additional html elements in which case the Assistant displays a number of additional tabs for each html element that can be configured (see Figure 2 above). Field Control, Table Control, Table Column Control, Button Column Control, Image Column Control, Page Navigation Panel all support the configuration of multiple html elements. Refer to them for more information.
The Html Element Properties Assistant allows three things to be configured for each supported element: Locators, Custom Attributes and Custom Event Handlers.
Locators
These provide a way of identifying individual html elements or groups of html elements; scripts will use these identifiers to find the html elements. Note that JQuery Custom Event Handler registration requires that a Locator is specified.
|
Property |
Description |
Name1 |
Type1 |
Get1 |
Set1 |
Get/Set Values1 |
|
Id |
A single value that is added as the id attribute of the html element. If the underlying html element is an input element, this value will also be used in its label’s for attribute. If this is left blank and the underlying element is an input element, the system will automatically generate an id and corresponding for value. Care must be taken to ensure the id is unique within the page. The id must contain letters and numbers only with no spaces. If the Control is repeated on a page - for example it is in a Repeater Control or represents a column in a Table Control - an Id cannot be entered and will not be added to the generated HTML page, as uniqueness could not be guaranteed. The exception to this is for Field Controls and Table Column Controls where a unique id and for attribute will be automatically created by the system. The id attribute is a common way of identifying specific elements in scripting languages, e.g. JavaScript. Adding Id properties to Controls allows Client Scripts to use them to easily find specific controls in the DOM of the HTML page for client-side manipulation in the browser. |
locatorId |
Character |
Yes |
No |
|
|
A space delimited list of names to be added to the class attribute of the underlying html element. Any number of class names can be specified. Each class name should contain numbers and letters only. Class names are a common way of identifying particular groups of html elements in scripting languages. Unlike the Id property, class names do not have to be unique; many different html elements can use the same name(s). Thus they are useful for grouping together html elements which Client Scripts can then manipulate as a group, rather than one at a time. Classes can also be used to provide styling for the html elements, in which case the class names provided should also exist in an associated Style Sheet (see How CSS Styling Is Applied). |
classLocator |
Character |
Yes |
No |
Space separated list of classes |
Custom Attributes
Html elements can have attributes attached to them. This property allows you to add your own.
|
Property |
Description |
Name1 |
Type1 |
Get1 |
Set1 |
Get/Set Values1 |
|
A comma delimited list of name/value pairs of the form: name=value. These are added as attributes to the underlying html element. HTML 5 allows custom attributes to be added to elements as well as defining many new attributes; an example is the new data-role attribute. If data-role=”page” is added to a Panel Control (where the underlying tag is a div) then, in conjunction with the JQuery Mobile library (http://www.jquerymobile.com), browsers on advanced mobile devices (e.g. smart phones) will treat the Panel as a new page, allowing a normal web page to be broken down into chunks to better fit on the smaller display of the mobile device. Custom attributes can contain any number of variables to be substituted dynamically at runtime with the values of one or more form fields or table columns. Each such variable must start with &&, followed by the form field name or table column name optionally surrounded by braces. For example: &&customAttrsField placeholder=’&&{placeHolderField}’ width=’100%’, type=’&&{typeSubField}’ Notes:
|
customAttributes |
Character |
Yes |
Yes |
|
|
API Method |
Description |
Parameters1 |
|
addCustomAttribute |
Adds a custom attribute to the custom attributes property. If the attribute already exists the value will be overridden with the new value. |
name – name of the attribute to add value – value of the attribute |
|
addCustomAttribute |
Adds a custom attribute to the custom attributes property with no value. |
name – name of the attribute to add |
|
removeCustomAttribute |
Removes the custom attribute from the custom attributes property if the attribute exists. |
|
Custom Event Handlers
Event Handlers provide the association between an Html element’s events and the Javascript code to be executed. The Javascript editor provides the same functionality as the Client Script editor.
Note that there are overlaps between the events the JQuery library generates and those that html generate (for example JQuery’s click event is the same as the onclick html event in that they are both generated in response to a user clicking a button). Verj.io allows both of these events to have Event Handlers; the Html Event Handler will run before the JQuery Event Handler.
Events ‘bubble up’ the DOM, triggering any appropriate Event Handlers as they go. For example, putting a Button Control in a Panel Control which is in a Page Control, and creating an onclick Html Event Handler and/or a click JQuery Event Handler and clicking the Button will create: an onclick and/or click event in the button (the Html onclick first), followed by an onclick and/or click event on the Panel Control (the Html onclick first), followed by an onclick and/or click event on the Page Control (the Html onclick first).
|
Property |
Description |
|
Html Custom Event Handlers |
Specify the JavaScript to be executed when a certain event occurs. A user’s interaction with a web page triggers a variety of different html events, for example clicking on a button generates an onclick event. These Event Handlers allow custom code to be associated with these events. This code can call functions in Client Scripts that have been associated with the page (see Working with Web Resources). Note that Verj.io may also include JavaScript to respond to some user interactions. For example when a user presses a button, the system submits the page so that any server side events can be executed. In these circumstances, the code provided in an Event Handler is executed first, followed by the Verj.io provided code. The code in the Event Handler can choose to stop the execution of the Verj.io code by returning false. Any number of Html Custom Event Handlers can be added to an html element, but only one Event Handler per event type can be added (for example only one onclick Event Handler can be added per element, but both an onclick and onmouseover Event Handler could be added). There are two things that need to be specified: Event and the code to be executed. EventA dropdown selection of events. Only one Event Handler can be created per event. CodeYour JavaScript code. This may refer to functions in Client Scripts associated with the Page. |
|
JQuery Custom Event Handlers |
These are similar to the Html Custom Event Handlers, but respond to JQuery events generated on the element. In order for these events to be triggered, the JQuery core library must be associated with the page (see the Client Script Configuration Dialog). Any number of JQuery Custom Event Handlers can be added to an html element, but only one Event Handler per event type can be added (for example only one click Event Handler can be added per element, but both an click and mouseenter Event Handler could be added). Using JQuery
Custom Event Handlers is preferred over setting up JQuery
bindings manually in a Client Script or in Html++. This is particularly
important if your form has been configured to use Three things are needed to configure a JQuery Event Handler: an alias, an event, and the code to be executed. AliasAll uses of JQuery start by calling its jQuery() function. JQuery also provides an alias, $, which is a shorthand way of referring to this function and makes for more elegant code. When you add a JQuery library to a page (via the Client Script Configuration Dialog) the $ alias is automatically created by the library. Instead of using the Client Script Configuration Dialog it is possible to add a JQuery library manually in a Client Script and by doing so you can configure a different alias for that library. There are two reasons you might want to use something other than the default alias: · Two versions of the JQuery library are needed in the same page. By using a different alias to call each version, you have control over which version of the library is used. · You want to use the $ for another library. In either case, the alias to use to connect the code to JQuery events can be configured. The event will only be registered for that given alias and cannot be registered for multiple aliases. EventA dropdown selection of the supported JQuery events for the underlying element. Only one event handler per event can be added. The ready
event
Most events run in response to a user interacting with the
page, e.g. clicking a button. The ready
event is different – it is run when the page first loads, or when a control
is shown from a previously hidden state and when the system refreshes the
control (if CodeYour JavaScript code. This may refer to functions in Client Scripts associated with the Page. JQuery Event Handlers are registered when the document issues a JQuery ready event. In order for a JQuery Event Handler to be registered, a Locator must be configured. If an Id locator is added then this will be used, otherwise the first Class locator specified will be used. The form of the registration is: For multi-parameter
events (e.g. toggle and hover) alias(document).ready(function() { alias(locator).event( your code here ); }); For ready event alias(document).ready(function() { your code here }); For everything else alias(document).ready(function() { alias(locator).event(function(e) { your code here }); }); |