Fields Wizard
The Fields Wizard is available from the Fields View panel by clicking on the fields wizard
icon ![]() or using shortcut key Alt Ctrl W when the panel is in focus. The Fields Wizard is used to
add multiple fields and optionally to add these as Field Controls to the
current page.
or using shortcut key Alt Ctrl W when the panel is in focus. The Fields Wizard is used to
add multiple fields and optionally to add these as Field Controls to the
current page.
New fields can be added manually and/or can be imported from any external resource in the form’s Resources View. When fields are imported from an external resource a mapping is also created between the form field and the resource field of the same name and this is shown in the Mapped resource column.
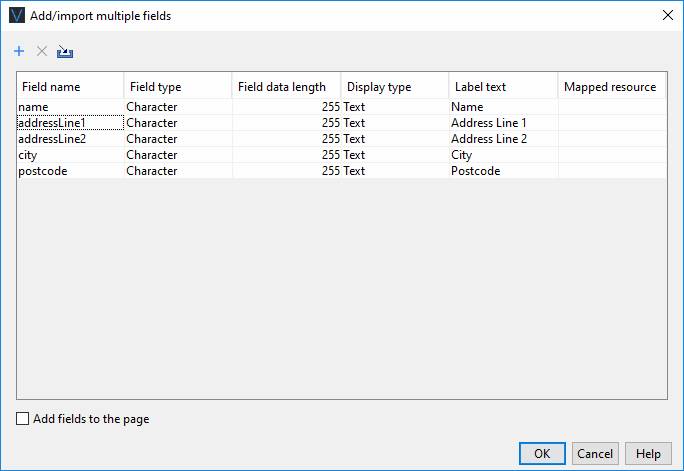
Fields are added by clicking the ![]() icon or by using the keyboard up and down
arrows. Fields are deleted by clicking the
icon or by using the keyboard up and down
arrows. Fields are deleted by clicking the ![]() icon.
icon.
Clicking the ![]() icon shows the Import fields from external resource
dialog. Mappings will be created for any fields selected from this dialog and
these will be shown in the Mapped
resource column.
icon shows the Import fields from external resource
dialog. Mappings will be created for any fields selected from this dialog and
these will be shown in the Mapped
resource column.
Clicking Add fields to the page will also create a Field Control for each page and add it to the currently selected control, if there is one.
Field name: enter a name for the new field
Field type: set the field type from the dropdown list
Field data length: the maximum length
Display type: set the display type from the dropdown list
Label text: the label text for the field – this is set initially from the field name and will interpret camel case names (as shown above e.g. addressLine1) or names delimited by underscores
Mapped resource:
indicates that a mapping between the field and the resource field of the same
name in the named resource will be created. This is shown only when fields have
been imported from a resource using the ![]() icon.
icon.