Fields View
See also: Field Control
Introduction
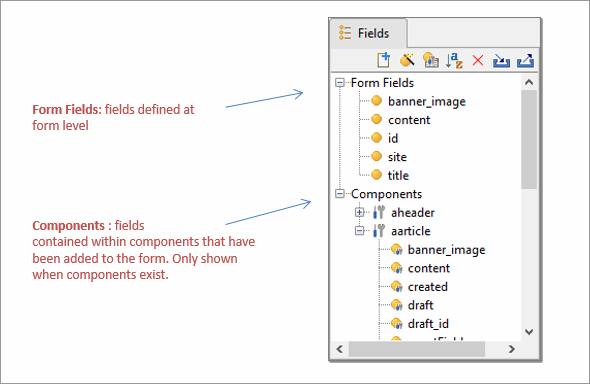
The Fields View shows all the form’s fields. Any fields from components that have been added are shown separately under the Components heading. Opening an individual component shows the name of each field as configured in the source component, moving the mouse over the field will show the fully prefixed name of that field in the form. The diagram above shows the fields for a form, but the display is very similar for all other entities that can have fields i.e. Components, Rest Services, Integration Services and Workflow Processes; the only difference is that the heading name Form Fields changes.
Any new fields are added to the top of the Form Fields section, and can be
re-sorted into alphabetical order by clicking the Sort fields icon ![]() .
.
Clicking on a field in the list displays the Field’s properties in the properties view.
A field can be renamed by double clicking on the field name.
To select a range of fields hold down the Shift key. To select multiple non-contiguous fields hold down the Ctrl key.
Fields toolbar
Following functions are available; shortcut keys shown in parentheses. Please note that short cut keys apply only when the Fields View panel is in focus.
|
|
(Ctrl N) |
Add a single new field |
|
|
(Alt Ctrl W) |
Add and import multiple fields using the Field wizard |
|
|
(Ctrl I) |
Insert a Fields & Tables Component |
|
|
|
Sort fields in alphabetical order |
|
|
(Delete) |
Delete selected field(s). This also removes any field controls that refer to the deleted items. |
|
|
|
|
|
|
|
Right click menu
Following functions are available when one or more fields are selected; shortcut keys shown in parentheses. Please note that short cut keys apply only when the Fields View panel is in focus.
|
New field |
(Ctrl N) |
Add a single new field |
|
Add and import multiple fields |
(Alt Ctrl W) |
Add and import multiple fields using the Field wizard |
|
Add component |
(Ctrl I) |
Insert a Fields & Tables Component |
|
Delete |
(Delete) |
Delete selected field(s). This also removes any field controls that refer to the deleted items. |
|
Create Resource |
|
|
|
Cut |
(Ctrl X) |
Same as copy, but also deletes selected field(s). |
|
Copy |
(Ctrl C) |
Copies selected field(s) to the clipboard. |
|
Paste |
(Ctrl V) |
Paste is only enabled when fields have previously been copied to the clipboard. You can copy/paste fields within a single form or component, or between forms and/or components. Fields are automatically renamed when a field with the same name already exists in the target form; this is done by adding an underscore and a number to the field name. Field mappings are retained when a mapping to the associated resource field does not already exist in the target form. Note that mappings are retained even when the corresponding resource is not part of the target form’s business view. This means that you can paste fields, then later add the resource to the target form’s business view and mappings will not be lost. All associated texts are also copied and renamed as required. Dynamic list field mappings are retained only where the mapped fields also exist on the clipboard or when this is a cut/paste operation within a single form. When the pasted fields include one or more deployed component fields, the fields are pasted as if they are not part of a component and double underscores in all names are changed to single underscores. |
|
References |
(Alt Ctrl R) |
Displays references to the selected field in the References Panel |
Help
The help key F1 displays this documentation page if pressed when the Fields View is in focus.