|
|
|
Uploading Files
See also: File Upload Controls, File Upload Validation Controls
Introduction
This document provides an overview of the tools available to allow users of an application to upload files from their local file system. Examples are also given below of a minimal implementation of file uploading, and a more in-depth application making use of the advanced functionality.
Ø For more technical details on the available controls and properties and their API methods, see File Upload Controls
Ø For information on the previous ‘uploadFileFromBrowser’ method, now deprecated, see Working with Files
Controls
File Upload Control
This is the fundamental control used for uploading files, and is the only one required for a simple implementation. It behaves like a button that, when clicked, brings up the browser’s file chooser interface, allowing users to select files from their local file system. By default the File Upload control waits for an upload to be triggered, but if the control’s ‘Immediate Upload’ property is ticked, all selected files are uploaded as soon as the file chooser interface is closed.
Initiate Upload Control
This is one of two controls which can be ‘associated’ with a File Upload control. It also behaves like a button that uploads all files selected by the associated control when clicked. The associated File Upload control can be set using the control’s ‘Associated Upload Control’ property; a drop-down menu will display all valid File Upload controls and allow one to be selected.
File Upload Text Control
This control displays the files currently selected by the associated File Upload control, or a ‘No file selected’ message if there are none. The associated File Upload control can be set in the same way as before. This control and the one above will attempt to automatically associate to a File Upload control when added to a page in the Studio, see here for more details.
Validation
It can often be helpful to validate files before allowing a user to upload them to ensure that they are of an expected type and not too large. The File Upload control provides several properties which allow parameters to be set for uploaded files, and attempts to ensure that any files uploaded are with the accepted parameters. Initially this is done in the user’s browser; if a selected file is detected to be an invalid size or type, the upload is prevented and a message is shown detailing the file and validation issue. When a file is uploaded it is validated again, and isn’t stored if it fails validation. For a more in-depth explanation of this, see File Upload Validation.
This validation is provided primarily to prevent user error,
and provides some confidence that uploaded files are within the specified
parameters. However, validation in the user’s browser is only used to improve
the user’s experience, providing minimal security as the browser is running on
the user’s machine and can be fully controlled by a malicious user. Additionally,
file types and sizes can in some cases be spoofed, so if this could affect
other users or the application itself it is recommended to implement additional
validation in your application.
Minimal example
Adding a single File Upload control to a page and ticking the ‘Immediately Upload’ option is enough to allow a user to upload a local file. Clicking the File Upload button (given the text ‘Upload File’ in this example) brings up the file chooser as shown below.
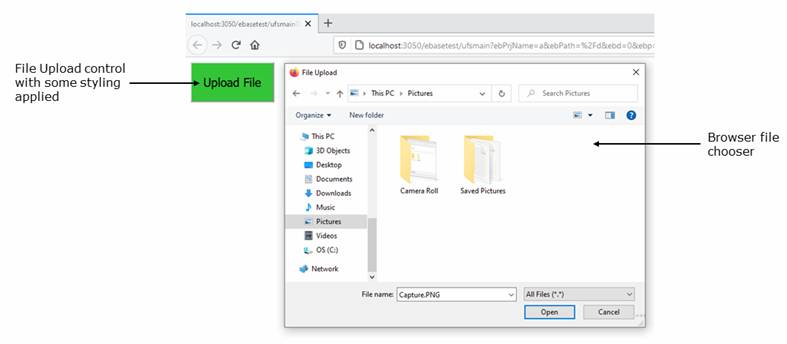
When a file is selected and ‘Open’ is clicked, the file will be uploaded to the directory specified by the Upload Location, configurable on the Server Administration Console. Further processing is possible using the On Upload Event, as shown in the next example.
Full example
In this example we add a File Upload, File Upload Text, and Initiate Upload control to the page, with panels to assist with spacing. We can set a number of options for the File Upload control. In this case we specify the expected file type as image/*, which uses the image MIME type with the wildcard ‘*’ to allow any type of image. We set the target directory to a relative path of ‘Photos’, which will upload files to a folder named ‘Photos’ in the Upload Location. We set the maximum file size to be 20 kilobytes, and tick the option to allow multiple files to be uploaded at once.

Additionally we create a script as shown below, and attach it to the File Upload control’s On Upload Event. This event will be triggered when files are uploaded. In this script we use a ‘controls’ API method to turn the File Upload control’s background colour green to indicate that the On Upload Event has occurred. We also use FileItem API methods to display some information about the uploaded files.
importPackage(com.ebasetech.xi.api);
importPackage(com.ebasetech.xi.services);
controls.fileUpload.backgroundColor = "Green";
var fileItems = controls.fileUpload.getFileItems();
while(fileItems.next())
{
var
fileItem = fileItems.fileItem;
if (fileItem.hasError())
{
controls.fileUpload.addErrorMessage(fileItem.getErrorMessage());
}
else
{
controls.fileUpload.addInfoMessage(fileItem.userFileName + " uploaded
successfully to " + fileItem.getRelativePath());
}
}
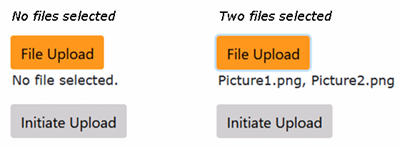
As seen in the first step below, the File Upload Text initially displays ‘No file selected.’ if run in an English locale. Clicking the File Upload button brings up the file chooser as before, which by default has a filter set to only display image files. Multiple files can be selected, and once confirmed the File Upload Text will instead display the names of the selected files as shown in step 2.
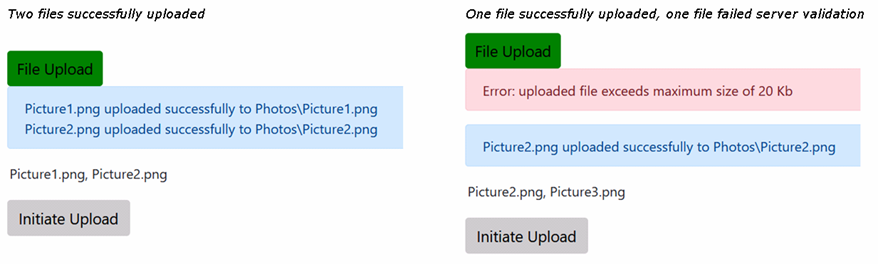
When the Initiate Upload button is clicked, the files are checked in the browser and then on the server to ensure that they are image files no larger than 20Kb. Once this is validated, a ‘Photos’ folder is created in the Upload Location if it doesn’t already exist, and the files are uploaded to this folder. The files uploading triggers the On Upload Event which we attached the script to, turning the File Upload control’s background green as expected. The left example shows two valid files uploaded, while the right example shows one valid file and one file which is larger than the maximum file size. The invalid file size would normally be caught in the user’s browser before the On Upload Event occurs, but in this case it is caught on the server and the script displays the error message.