RESTful Web
Service Tutorial
Part 1: Building a simple GET RESTful Web
Service
Part 2: Building a simple POST RESTful Web
Service with Basic Authentication
Part 3: Building a simple DELETE RESTful with
Path Parameters
See also: Publishing RESTful Web Services Overview, RESTful Services, Endpoint Scripting, Server Admin Web Service Administration, Publishing Web Service Documentation
Introduction
The following tutorial demonstrates how to create a basic pet store
RESTful Web Service. The following sections demonstrate how to:
- Building a simple GET RESTful
Web Service: This tutorial steps you through how to implement an
endpoint that retrieves all pets from our pet store application.
- Building a simple POST
RESTful Web Service with Basic Authentication: This tutorial steps you
through how to implement an endpoint that adds a new pet to the pet store
with HTTP Basic authentication.
- Building a simple DELETE
RESTful Web Service that uses path parameters: This tutorial steps you
through how to implement an endpoint that deletes a pet from the pet store
using the pet ID as path parameter.
Prerequisites for
running this tutorial:
- The Verj.io Integration Service module is
licensed. To check , start the Server
Administration Application and click License on the home page >
check the Details tab
Installed Features:
Verj.io
Integration Server [x]
- A copy of the
EBASE_SAMPLES database and a Database connection. The EBASE_SAMPLES
database should already exist with a new installation of Verj.io. You can create or verify the database
connection using the Server
Administration Application and click Database Connections.
Part 1: Building a simple GET RESTful Web Service
In this tutorial, we will create a new RESTful Web Service and add an endpoint to retrieve all the pets in our online pet store application. The endpoint accepts two optional request parameters that filter the type of pet and limit the number of pet records retrieved from the database. We will also add a script to test whether the database table exists and create it if required that we will be using in this tutorial.
Create a RESTful Web Service and add a table and an endpoint.
- Start the Verj.io Studio.
- Create a new project: right click in the Entities tree panel on the left hand side and select New > Project, name the project Tutorials.
- Create a new folder: right click on the Tutorials project and select New > Folder, name the folder petstore.
- Create a new RESTful Web Service: right click on the petstore and select New > RESTful Web Service, name the service petstore.
- Add a script to validate the
database table exists for this tutorial: Click the
 toolbar button. Click the
  button in the Shared Functions panel. Click the
  button on the Configure scripts dialog
toolbar, give the script the name createDatabaseTable.
Click the OK button.
button on the Configure scripts dialog
toolbar, give the script the name createDatabaseTable.
Click the OK button.
- We are now going to add the logic to validate whether the database table exists within the EBASE_SAMPLES database. If the pets database table does not exist we will then create it and populate the table with data. The script will be used by all the tutorials in this document. Enter the following text into the createDatabaseTable script:
importPackage(com.ebasetech.xi.api);
importPackage(com.ebasetech.xi.services);
/**
* Check whether a database table exists and
create the table if it does not.
* @param dbName database name to use
* @param
tableName database table name to check or create.
*/
function createTables(dbName,
tableName)
{
var
exists = checkTableExists(dbName,
tableName);
if(!exists) {
var created = createTable(dbName, tableName);
if(created)
{
//populate the database table with some data
insertPets("EBASE_SAMPLES", "pets", 1,
'Rover', 'Black and White Collie', 'dog');
insertPets("EBASE_SAMPLES",
"pets", 2, 'Freddy', 'Chocolate Labrador', 'dog');
insertPets("EBASE_SAMPLES", "pets", 3,
'Bobby', 'Golden Doodle', 'dog');
insertPets("EBASE_SAMPLES",
"pets", 4, 'Ginger', 'Ginger Tom', 'cat');
insertPets("EBASE_SAMPLES", "pets", 5,
'Tiddles', 'Black and White Cat', 'cat');
insertPets("EBASE_SAMPLES", "pets", 6,
'Chloe', 'Tabby Cat', 'cat');
insertPets("EBASE_SAMPLES", "pets", 7,
'Thumper', 'Black Buck Rabbit', 'rabbit');
insertPets("EBASE_SAMPLES", "pets", 8,
'Nibbles', 'Albino Rat', 'rat');
}
else
{
return false;
}
}
return true;
}
/**
* Create the database table in a specified
database
* @param dbName database name to use
* @param
tableName table to create.
*/
function createTable(dbName,
tableName)
{
var
con, stmt;
try
{
/**create the database table**/
con = system.getDatabaseConnection(dbName);
stmt = con.createStatement();
stmt.executeUpdate("create
table PETS (ID INTEGER NOT NULL, NAME VARCHAR(100) NOT NULL, DESCRIPTION
VARCHAR(255), TAG VARCHAR(20), PRIMARY KEY(ID))");
return true;
}
catch(e)
{
log("Error creating \nTable
Name: " + tableName + "\n" + e);
return false;
}
finally{
// close the connection
if(stmt) stmt.close();
if(con) con.close();
}
}
/**
* Check whether a table exists in a specified
database
* @param dbName database name to use
* @param
tableName table to check whether it exists.
*/
function checkTableExists(dbName,
tableName)
{
var
con, tbls;
try{
/* open a database connection and get the full list of tables at that
connection
* We
can't narrow by schema or table name because different databases implement
* schemas differently
and handle case differently */
con = system.getDatabaseConnection(dbName);
var dbmd
= con.getMetaData();
tbls = dbmd.getTables(null,
null, null, null);
// loop through the returned tables, if any of them match the given
name, return true
while(tbls.next()){
if(tableName.toUpperCase()
== tbls.getString(3).toUpperCase())
return true;
}
// if no match is found, return false
return false;
}
catch(e){
log("Table exists check failed \nTable
Name: " + tableName + "\n" + e);
return true;
}
finally{
// close the connection
if(tbls) tbls.close();
if(con) con.close();
}
}
function insertPets(dbName,
tableName, id, name, description, tag)
{
var
con, stmt;
try
{
/**create the database table**/
con = system.getDatabaseConnection(dbName);
stmt = con.prepareStatement("insert into pets (id, name,
description, tag) values (?, ?, ?, ?)");
stmt.setInt(1, id);
stmt.setString(2, name);
stmt.setString(3,
description);
stmt.setString(4, tag);
stmt.executeUpdate();
}
catch(e)
{
log("Error creating \nTable
Name: " + tableName + "\n" + e);
return false;
}
finally{
// close the connection
if(stmt) stmt.close();
if(con) con.close();
}
}
- Click the
 button to save the createDatabaseTable script.
- Select the
 petstore tab
at the top of the Verj.io Studio.
petstore tab
at the top of the Verj.io Studio.
- Add
a table to the RESTful Web Service: Select the
 Tables tab and click the
  (New table) button on the toolbar, name
the table pets. Click the Create new columns button and then
click the
(New table) button on the toolbar, name
the table pets. Click the Create new columns button and then
click the  three times add and enter following table
columns:
three times add and enter following table
columns:
|
Name |
Field Type |
|
id |
Integer |
|
name |
Character |
|
description |
Character |
|
tag |
Character |
Click the OK button.
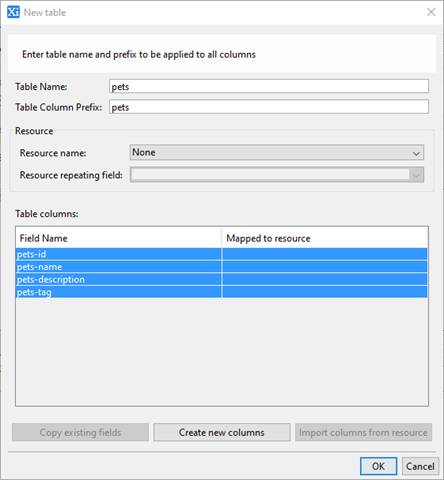
Click the OK button on the New table dialog. This will create the table and columns fields.
- Create
a new endpoint: Click the button in the left hand panel of the
RESTful Web Service, name the endpoint getPets. Click the OK button. This will create a new
endpoint and automatically select the endpoint in the RESTful Web Service
tree in the left hand panel.
- Rename the Endpoint URI: change the text from /getPets to /pets.
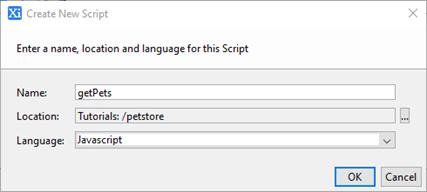
- Create
a new endpoint event: Click on the
 toolbar button on the Event Scripts > Endpoint tab, name the script getPets.
Click the OK button.
toolbar button on the Event Scripts > Endpoint tab, name the script getPets.
Click the OK button.
- We are now going to add the scripting logic to retrieve the pets from the database. The following script validates whether the database table exists by calling the Shared Function - createDatabaseTable. The script will then run a query against the database and then populates a Verj.io table. The table is then converted to JSON formatted string and returned back to the caller as the response. This script accepts two request parameters:
|
Parameter Name |
Description |
|
tag |
Optional parameter: used to filter the records by type of pet e.g “dog”, if absent, all records are returned. |
|
limit |
Optional parameter: used to limit the number of records returned, if absent, no limit is set. |
Enter the following script text into the getPets script:
importPackage(com.ebasetech.xi.api);
importPackage(com.ebasetech.xi.services);
try
{
//validate and create the pets database table
calling the shared function
if(!createTables("EBASE_SAMPLES", "pets"))
throw
"Error creating database table 'pet'";
var
tag = form.rest.getRequestParameter("tag");
var
limit = form.rest.getRequestParameter("limit");
//search pets
searchPets(tag, limit);
//convert the pets table to JSON
var
responseBody = tables.pets.toJSON();
//set the response body
form.rest.setResponseBody(responseBody);
}
catch(e)
{
form.rest.setResponseBody("Error finding retrieving pets: " + e);
form.rest.setResponseStatus(500);
}
/**
* Runs a query to return all the pets from the
pets database table.
* @param tag
optional parameter to filter the type of pet from the database e.g dog
* @param limit
optional parameter to limit the number of records returned in the results.
*/
function searchPets(tag, limit)
{
var index = 0;
var stmt = "select id, name,
description, tag from pets";
if(tag)
{
stmt = stmt
+ " where tag = '" + tag + "'";
}
services.database.executeSelectStatement("EBASE_SAMPLES", stmt,
function (columnData)
{
if(limit &&
limit <= index)
return false;
tables.pets.insertRow();
tables.pets.id.value
= columnData.ID;
tables.pets.name.value
= columnData.NAME;
tables.pets.description.value
= columnData.DESCRIPTION;
tables.pets.tag.value
= columnData.TAG;
index++;
});
}
- Click the
 button to save the getPets script.
- Select the petstore tab
at the top of the Verj.io Studio.
- Click the
 button to save the RESTful Web Service.
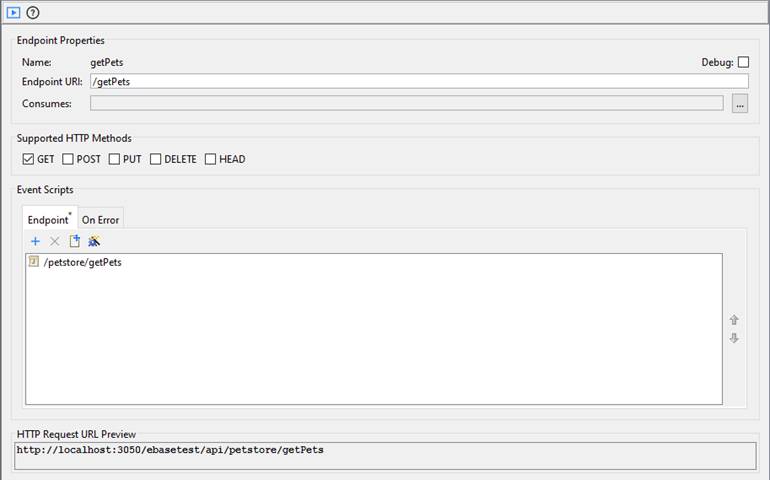
At this point the endpoint should look like this:
- Click
the
 button on the endpoint toolbar.
The HTTP Request Preview should contain the following text:
GET http://localhost:3050/ebasetest/api/petstore/getPets
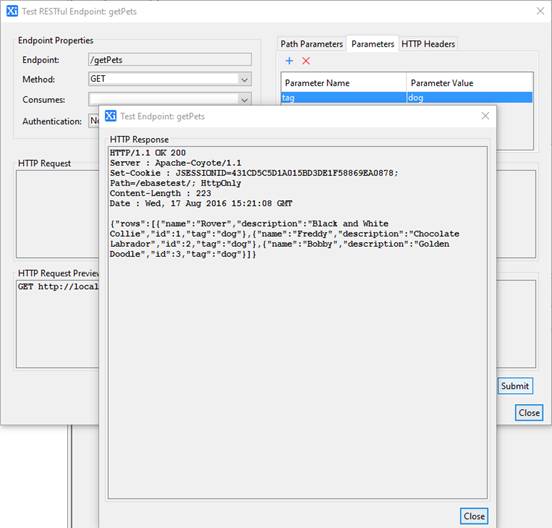
- Click the Submit button. The response should have returned a HTTP status code 200 and a JSON object containing 8 rows. The response should look like this:
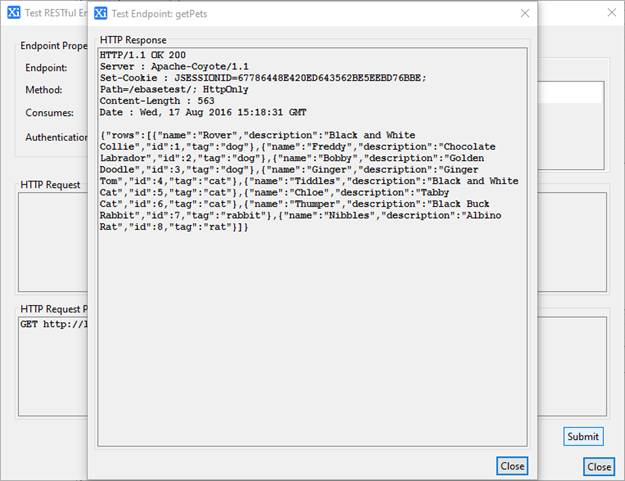
Click the Close button to close the Response Dialog.
- We
are now going to test the optional parameters. First we will test the tag parameter: Select the Parameters tab, click the button to add a new parameter. Enter the
name tag followed by the return
key and the value dog followed
by the return key.
The HTTP Request Preview should now contain the following text:
GET
http://localhost:3050/ebasetest/api/petstore/getPets?tag=dog
- Click the Submit button again to retest the service. The response should contain 3 rows and look like this:
Click the Close button to close the Response Dialog.
- We
are now going to test the other optional parameter: Select the Parameters tab, click the button to add a new parameter. Enter the
name limit followed by the
return key and the value 2 followed
by the return key.
The HTTP Request Preview should now contain the following text:
GET
http://localhost:3050/ebasetest/api/petstore/getPets?tag=dog&limit=2
- Click the Submit button again to retest the service. The response should now only contain 2 rows and look like this:
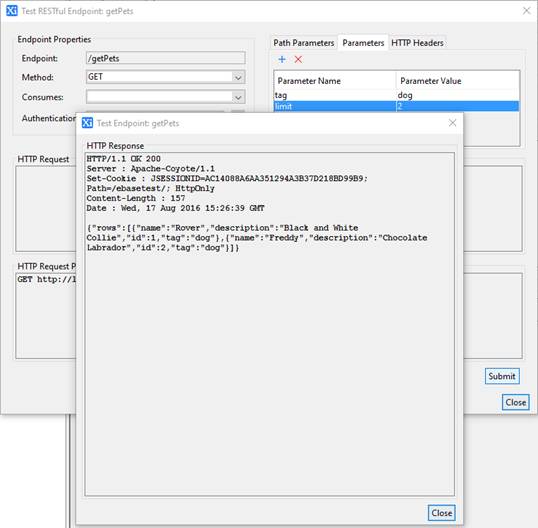
Click the Close button to close the Response Dialog.
Click the Close button to close the Test Dialog.
Part 2: Building a simple POST RESTful Web Service with Basic Authentication
In this tutorial, we will create an endpoint to add a new pet to our online pet store application. The endpoint accepts a HTTP POST call and a request body containing a JSON object. To add information into the database we need to implement HTTP Basic authentication.
Create a shared script to handle the authentication for the RESTful service so that it can be reused with other endpoints and create an endpoint to add a pet to the pet store.
- First
we will add a shared script to handle the authentication of the user:
Click the
 button on the RESTful Web Service toolbar.
Click the
button on the RESTful Web Service toolbar.
Click the  button in the Shared Functions panel. Click the
  button on the Configure scripts dialog
toolbar, give the script the name authenticateUser.
Click the OK button.
button on the Configure scripts dialog
toolbar, give the script the name authenticateUser.
Click the OK button.
- We are now going to add logic to authenticate a user: the script will authenticate the username and password credentials for the user. Enter the following text into the authenticateUser script:
importPackage(com.ebasetech.xi.api);
importPackage(com.ebasetech.xi.services);
function validateUser(username, password)
{
log("validating username: " + username);
if(username == "demouser"
&& password == "demopwd")
return true;
else
return
false;
}
- Click the
 button to save the autheticateUser script.
- Select
the
 petstore at the top of the Verj.io Studio.
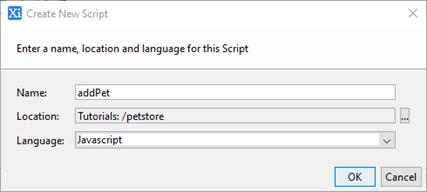
- Create
a new endpoint: Click the button in the left hand panel of the
RESTful Web Service, name the endpoint addPet. Click the OK button, this will create a new
endpoint and automatically select the endpoint in the RESTful Web Service
tree in the left hand panel.
- Click the on the Consumes field and select application/json, click the OK button.
- Deselect the GET and select the POST within the Supported HTTP Methods.
- Create
a new endpoint event: Click on the
 toolbar button on the Event Scripts >
Endpoint tab, name the script addPet. Click the OK
button.
toolbar button on the Event Scripts >
Endpoint tab, name the script addPet. Click the OK
button.
- We are now going to add the logic to authenticate the user and add a new pet to the pet store. The following script validates whether the database table exists by calling the Shared Function - createDatabaseTable. The script will then authenticate the user credentials, if the authentication credentials are missing, a HTTP 401 response is returned or if the authentication fails, a HTTP 403 response is returned. If authentication is successful the script converts the JSON object from the HTTP request and creates a new pet ID. The pet is then inserted into the database. The new ID is returned back as the response in JSON format.
Enter the following script text into the addPet script:
importPackage(com.ebasetech.xi.api);
importPackage(com.ebasetech.xi.services);
try
{
//validate and create the pets database table
calling the shared function
if(!createTables("EBASE_SAMPLES", "pets"))
throw
"Error creating database table 'pet'";
//do some authentication
var
cred = form.rest.readBasicAuthenticationCredentials();
var
authenticated = false;
if(cred)
{
//authenticate user
if(validateUser(cred.getUsername(), cred.getPassword()))
{
var requestBody
= form.rest.getRequestBody();
if(requestBody)
{
log("Incoming
Request: " + requestBody);
//A new pet consists of a name, description
and a tag for filtering the type of pet.
//convert the json
to an object
var
pet = JSON.parse(requestBody);
if(!pet.name)
{
//no request
body, send back back request
form.rest.setResponseStatus(400);
form.rest.setResponseBody("No pet name specified.");
}
else
{
//insert
pet
var id = addPet(pet.name, pet.description, pet.tag);
//set
back new pet id
var newPet
= {};
newPet.id = id;
form.rest.setResponseBody(JSON.stringify(newPet));
}
}
else
{
//no request body, send back back request
form.rest.setResponseStatus(400);
form.rest.setResponseBody("No pet details found.");
}
}
else
{
//just reject
the user
form.rest.setResponseStatus(403);
}
}
else
{
log("No
credentials");
form.rest.setResponseHeader("WWW-Authenticate", "Basic realm=\"User
Realm\"");
form.rest.setResponseStatus(401);
}
}
catch(e)
{
form.rest.setResponseBody("Error adding pet: " + e);
form.rest.setResponseStatus(500);
}
function addPet(name, description, tag)
{
var id = createId();
var insert = "insert into
pets (id, name, description, tag) values " +
"("
+ id + ", '" + name + "', '" + description + "',
'" + tag + "')";
log(insert);
services.database.executeGenericUpdateStatement("EBASE_SAMPLES", insert);
return id;
}
function createId()
{
var id = 1;
var stmt = "select max(id) as
max_id from pets";
services.database.executeSelectStatement("EBASE_SAMPLES", stmt,
function (columnData)
{
if(columnData.MAX_ID)
{
id = columnData.MAX_ID + 1;
}
});
return id;
}
- Click the
 button to save the addPet script.
- Select the
 petstore tab
at the top of the Verj.io Studio.
petstore tab
at the top of the Verj.io Studio.
- Click the button to save the RESTful Web Service.
At this point the endpoint should look like this:
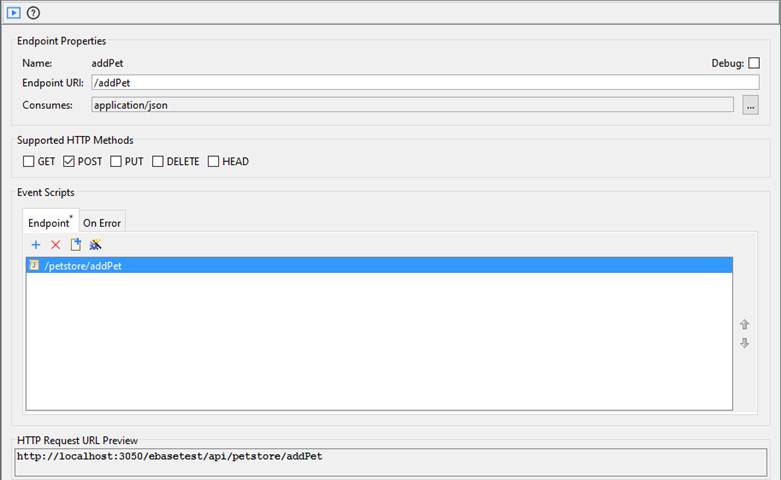
- Click
the button on the endpoint toolbar.
The HTTP Request Preview should contain the following text:
POST
http://localhost:3050/ebasetest/api/petstore/addPet
Content-Type :
application/json
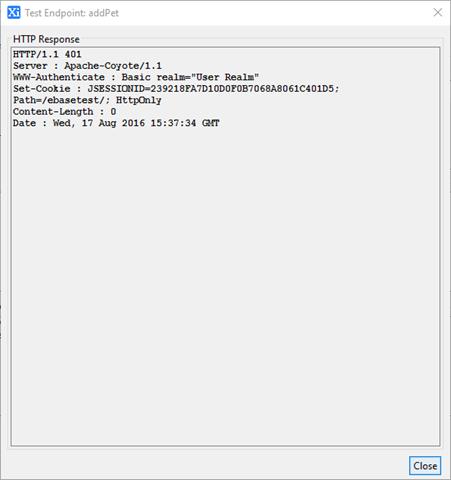
- First we are going to test the
HTTP 401 response by not adding any user credentials. Click the Submit button. The response should
look like this:
Click the Close
button to close the Response Dialog.
- We are now going to test a
successful post request. Select the option Basic on the Authentication
drop down, click the button next to this and enter the
credentials:
Username: demouser
Password: demopwd
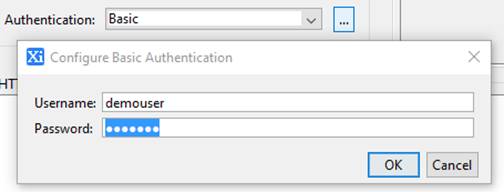
Click the OK button to close the window
- Enter the following text into
the HTTP Request:
{
"name":
"Sadie",
"description":
"Yorkshire terrier",
"tag":
"dog"
}
The HTTP Request Preview should contain the following text:
POST http://localhost:3052/ufs/api/petstore/addPet
Content-Type : application/json
Authorization : Basic ZGVtb3VzZXI6ZGVtb3B3ZA==
{
"name":
"Sadie",
"description":
"Yorkshire terrier",
"tag":
"dog"
}
- Click the Submit button. The response should have returned a HTTP 200 and a new pet ID. The response should look like:
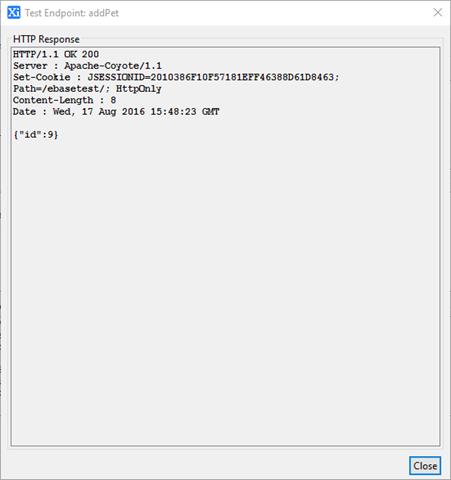
Click the Close button to close the Response Dialog.
Click the Close button to close the Test Dialog.
- We
are going validate that the new pet has been added to the pet store. Click
the
 getPets endpoint on the left hand panel.
- Click
the button on the endpoint toolbar.
- Click
the Parameters panel. Select
both the tag and limit parameters and click the
 button to remove them.
- Click the Submit button. The response should now contain 9 rows and contain the new pet Sadie that was added in the previous step. The response should look like this:
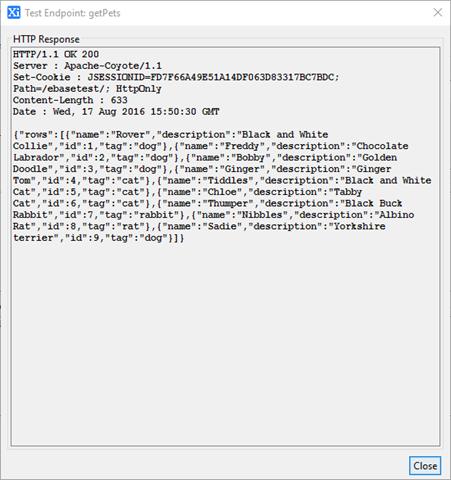
Click the Close button to close the Response Dialog.
- We are now going to test the
unsuccessful credential post request. Select the addPet endpoint in the left hand panel.
- Select the option Basic on the Authentication drop down box, click the button next to this and enter the
credentials:
Username: fred
Password: bloggs
Click the OK
button.
- Click the Submit button. The response should have returned a HTTP response of 403 and look like this:
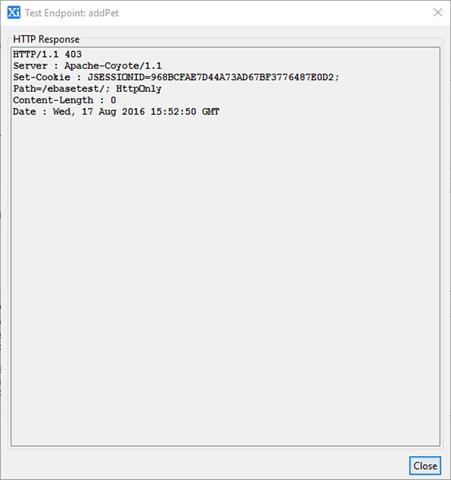
Click the OK button to close the Response Dialog.
Click the Close button to close the Test Dialog.
Part 3: Building a simple DELETE RESTful Web Service that uses path parameters
In this tutorial, we will create an endpoint to delete a pet from our online pet store application. The endpoint accepts a HTTP DELETE call and contains a pet ID as a path parameter on the request URI. Path parameters are configured on the endpoint URI and are identified by enclosing { } brackets. To delete information from the database we need to implement HTTP Basic authentication that we have already created in Part 2.
- Create
a new endpoint: Click the button in the left hand panel of the
RESTful Web Service, name the endpoint deletePet. Click the OK
button. This will create a new endpoint and automatically select the
endpoint in the RESTful Web Service tree in the left hand panel.
- We are going to add a path parameter to the endpoint URI: edit the Endpoint URI, edit the text so that it contains: /deletePet/{petId}
- Deselect the GET and select DELETE within the Supported HTTP methods.
- Create
a new endpoint event: Click on the
 toolbar button on the Event Scripts,
Endpoint tab, name the script deletePet. Click the OK button.
toolbar button on the Event Scripts,
Endpoint tab, name the script deletePet. Click the OK button.
- We are now going to add the logic to authenticate the user and delete a pet from the pet store that is identified by a pet ID. The following script validates whether the database table exists by calling the Shared Function - createDatabaseTable. The script will then authenticate the user credentials, if the authentication credentials are missing, a HTTP 401 response is returned or if the authentication fails, a HTTP 403 response is returned. If authentication is successful the pet ID is extracted from the path parameters and the pet is deleted from the database.
Enter the following script text into the deletePet script:
importPackage(com.ebasetech.xi.api);
importPackage(com.ebasetech.xi.services);
try
{
//validate and create the pets database table
calling the shared function
if(!createTables("EBASE_SAMPLES", "pets"))
throw
"Error creating database table 'pet'";
//do some authentication
var
cred = form.rest.readBasicAuthenticationCredentials();
var
authenticated = false;
if(cred)
{
//authenticate user
if(validateUser(cred.getUsername(), cred.getPassword()))
{
var id = form.rest.getPathParameter("petId");
if(id)
deletePet(id);
}
else
{
//just reject
the user
form.rest.setResponseStatus(403);
}
}
else
{
log("No
credentials");
form.rest.setResponseHeader("WWW-Authenticate", "Basic realm=\"User
Realm\"");
form.rest.setResponseStatus(401);
}
}
catch(e)
{
form.rest.setResponseBody("Error deleting pet: " + e);
form.rest.setResponseStatus(500);
}
function deletePet(id)
{
var
deletePet = "delete from pets where id= " +
id;
log(deletePet);
services.database.executeGenericUpdateStatement("EBASE_SAMPLES", deletePet);
}
- Click the
 button to save the deletePet script.
- Select the
 petstore tab
at the top of the Verj.io Studio.
petstore tab
at the top of the Verj.io Studio.
- Click the button to save the RESTful Web Service.
- Click
the button on the endpoint toolbar.
- Select the Path Parameters tab and double click the value cell next to the petId name, enter the value 1 followed by the return key.
- Select option Basic on the Authentication drop down box, click the button next to this and enter the
credentials:
Username: demouser
Password: demopwd
The HTTP Request Preview should contain the following text:
DELETE
http://localhost:3050/ebasetest/api/petstore/deletePet/1
Authorization :
Basic ZGVtb3VzZXI6ZGVtb3B3ZA==
- Click the Submit button. The response should have returned a HTTP response of 200 and look like this:
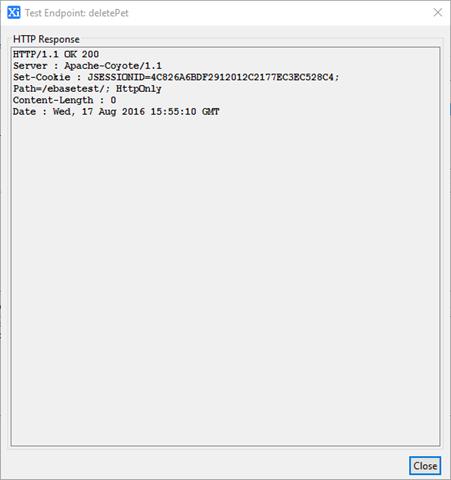
Click the Close button to close the Response Dialog.
Click the Close button to close the Test Dialog.
- Repeat steps from Part 2 to verify that the pet is removed from the pet store. Note that the response should not contain the pet that has the ID of 1.
This now completes the RESTful Web Service tutorials. The completed tutorials can be imported from file Studio/samples/restful_service/restful.zip of the studio installation.